Pages

Wednesday 13 November 2013

Maple Steamed Cake

Hi everybodyyyy! so today i'm gonna make a maple steamed cake. I never made a steamed cake before, so this is my first attempt coz you guys requested it and it turned out good! Put a smile on my face :D

This recipe is super simple, super easy, and doesn't take a such long run to make. i know you guys are smiling right now =)


So, you're going to need 

A wet ingredients which are :

- 100 ml milk
- 1 egg
- 1 tbsp maple syrup
- 1 tbsp cooking oil

And the dry ingredients ;

- 150 grams cake flour
- 30 grams powdered sugar
- 2 tsp baking powder
- a pinch of salt

Lets start!

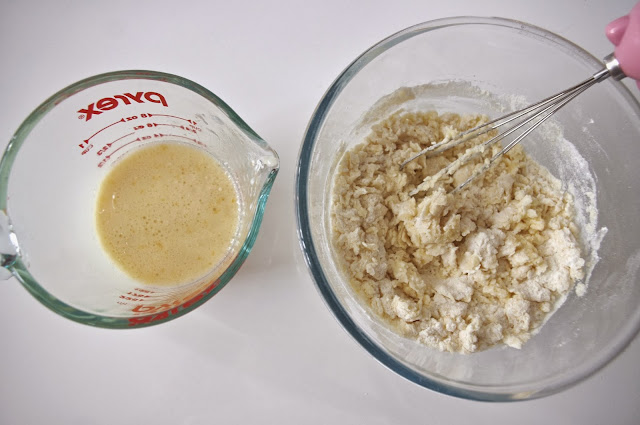
Pour all the wet ingredients in a mixing cup, then mix it together (you may make a little bubble, that's okay! :D)


Then put all your dry ingredients together, and whisk it lightly just until it mixed well

Pour 1/2 of the wet ingredient into the dry ingredient and mix it well. 

Then Pour the remaining wet ingredient and whisk it but don't use the circle motion, just fold it. Remember do not over mix, just until it mixed up. And prepare your little mould (you can use cupcake liner but the hard one, do not use the thin one coz it wouldn't work)

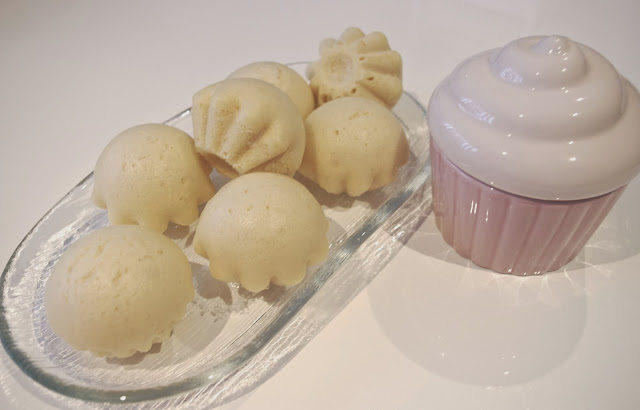
Fill in the mould until full, then put into the steamer (you can use rice cooker instead :D). Cook them for about 10 mins, then it's done!! Easy huh? =)


just a little tip : if you use the aluminium mould, you may find a difficulty to take the cake out. so here's the tip so you can take it out easily without breaking the cake. Wait until the cake cooled to room temperature and gently "pinch" the side of the cake to loosen up the edges. Once the edges has loosened up, slowly take out the cake from the mould. 
Sunday 10 November 2013

Red Velvet in a Jar

Such a looonggg weeks since my last post, my apologize :'( So few weeks agooooo i got emails that requested me to make a red velvet cake. I actually have made this cake many times in cupcake form and i'm sure you saw lots of red velvet recipe out there :)

so i was thinking to make another kind of this cake, and i decided to make it in a jar! Basically it's just a regular red velvet with cream cheese frosting but in a jar form (i thought it's kinda cute tho :p)


Here's what you need :

- 2 jar (any regular jar you'd prefer)

for the cake :

- 125 grams sifted cake flour

- 1/4 teaspoon baking powder 

-1/2 teaspoon baking soda

- 1/4 teaspoon salt

- 1 tablespoon regular or dutch processed cocoa powder

- 57 grams insalted butter (room temperature)

- 150 grams granulated white sugar

- 1 large egg

- 1/2 teaspoon pure vanilla extract 

- 120 ml buttermilk

- 1 tablespoon liquid red food colouring (you just adjust the amount depend on how red you want it to be)

- 1/2 teaspoon balsamic vinegar (you can use the white vinegar, but i find the balsamic is sweeter than the white vinegar)

for cream cheese frosting :

- 227 grams cream cheese (room temperature)

- 1/2 teaspoon pure vanilla extract

- 60 grams powdered sugar

- 60 ml cold heavy whipping cream

How to make it :

Preheat oven to 175 degrees C, and line the pan with the baking paper. I use the regular round baking pan.

In a large bowl sift together the flour, baking powder, salt, and cocoa powder. In the bowl of your electric mixer, beat the butter until soft (about 1-2 minutes)

Then add the sugar and beat until light and fluffy (about 2-3 minutes)

Add the egg and beat until incorporated, add the vanilla extract and beat until combined (don't forget to scrape down the sides of the bowl)

When you add the egg you might find the batter a little "scramble", don't worry coz that's normal, it will gets "normal" once you add the liquid and flour =)

In a measuring cup whisk the buttermilk with the red food colouring. With the mixer on low speed, alternately add the flour mixture and buttermilk to the butter mixture, in three additions, beginning and ending with the flour

On this step you want to work quickly, in a small cup combine the vinegar and baking soda. Allow the mixture to fizz and then quickly fold into the cake batter. 

Then quickly divide the batter into the pan, and smooth the top using an offset spatula or the back of a spoon. Bake for approximately 25-30 minutes, or until a toothpick inserted in the center of the cakes comes out clean. Cool the cake on a wire rack, and we can make our frosting :)

To make the frosting, you have to make sure that your cream cheese is at room temperature otherwise you'll get so many lumps, and you don't want that in your frosting. Using electric mixer or hand mixer, beat the cream cheese until smooth. 

Add the vanilla and confectioner sugar and beat unil smooth.

Now you want to change to whisk attachment, and gradually add the heavy cream and whip it until the frosting is thick enough to pipe. If you find it too runny, you can always add more sugar. Or if it's too thick, you can add more cream.

Note : you must use the brand of heavy cream that whips very easily to staff peaks. If you are using a brand that doesn't, then whip it separately to stiff peaks and then fold it into the cream cheese mixture.

Now your red velvet has cooled down, go cut the cake to your jar size. Note that you may want the size of the cake little bigger than your jar. There's no need to be super neat for this step. 
Put your red velvet cake on the bottom of the jar, then put the frosting on the top, then add another layer of cake, then the frosting. repeat this step until you reach the top of your jar (i end it with the frosting, so i can use a sprinkle on the top ;D)
Thats it! pretty easy right :p


Wednesday 23 October 2013

Italian Tiramisu

helooooo everyone.. So yesterday i made a Italian Tiramisu. Honestly it's the first time i make this kind of tiramisu. The usual kind of tiramisu i make is using a chocolate sponge cake with a cappucino touch, but this time i'm using a lady finger sponge and this is how tiramisu supposed to be :D.

Here are what you need :

- 5 egg yolks
- 150g sugar (if you want less sweet, use 120g)
- 450g mascarpone cheese (1 package)
- 16 lady fingers (it depends on how big your lady finger is, mine is quite big)
- coffee (you can add in a Marsala, this is optional)
- unsweetened cocoa powder
- milk chocolate
- strawberries to decorate

first, crack your eggs and separate the yolks and egg whites (don't throw the egg whites, we can use it for macarons :)) and add the sugar


whisk the egg yolks and sugar until it become thick and pale colour


Then put the bowl in the top of the double boiler over the boiling water. reduce heat to low, and cook for about 10 minutes, stirring constantly. After 10 minutes, you want to let this cool completely before you add in the mascarpone. Don't add in the mascarpone while it's still hot or warm, your mascarpone will melt and your dessert will be ruined. So we want it completely cool.

Add Mascarpone to whipped yolks, and gently fold until combined


Make the espresso by adding 4 tbs of espresso and 1 cup of hot water and let it cool, and prepare you pan (any pan you can use that thick enough to make 3 layer of tiramisu)

Dip in the lady fingers to the espresso mixture just until it get wet (Do not dip them) then place them in the pan

Spoon the mascarpone cream filling on the top dipped lady fingers, and level them. Then place more lady fingers on top of the cream

Repeat this process until you get 3 layers, then refrigerate for 4 hours or overnight.

Dust them with cocoa powder and chocolate garnish before serving, and add the strawberry for the finishing :)


Saturday 12 October 2013

Banana Frosting

hi everyone!

i got several requests for this banana frosting (the one i use for the banana choco cupcake). This is so easy and delish!

Let's get started. You're going to need :

- 90g unsalted butter (at room temperature)
- 1 ripe banana (mashed)
- 1 1/4 cup ising sugar (confectioners sugar)
- 1-2 tbsp of cream

how to make it :

 Melt the butter and mashed banana, then stir for 1 minutes and leave it to cool slightly. We just want them to slightly cool, not completely cool.


 Strain the banana butter (don't push the banana, we only want the melted butter)

 It will get approx 60g of banana butter, then add in the icing sugar, mix them until incorporated.


Slowly add 1-2 tbsp cream (i find 1 tsbp is enough to reach the consistency that i want)


 Here is your banana frosting :D

Notes : do not mashed the banana using blender. I was using the blender, and it didn't turn out so good when you strain them :(. Mashed them using a fork or hand :)
Monday 7 October 2013

Banana choco cupcake

helloooo everyone! so i have so many left over over-ripe banana, and i was thinking what can i use them for. Then this thought of banana cupcake just came up :D and i think it'd perfect with a touch of choco chips and almond


so here what you need :

- 100g Butter at room temperature
- 282g sugar
- 1.5 cups of plain flour
- 1 tsp baking powder
- 2 eggs
- 1 cup whipping cream
- 1/2 tsp vanilla extract
- 1 over-ripe banana (mashed)
- 50g chocolate chip
- 20g crushed almond

Preheat your oven to 160 C

 Beat the butter and sugar until light and fluffy


beat in the eggs one at a time just until incorporated, do not over mixed


In another bowl, mix the flour and baking powder and whisk them to get rid any lumps, then beat them in to the egg mixture


Crushed the almond


mix it well together


i'm using a mini cupcake pan

divide them equally, fill until just 70% full

Bake them for 14 minutes

Tips : i usually check them a couple minutes before to prevent over baked. just using a toothpick, insert to the middle and it should have several crumbs when it comes out. Then wait 2 minutes, insert the toothpick again, and it should comes out clean.


i topped them with banana frosting :)


ENJOY :)


Monday 23 September 2013

Eps 3 : Vanilla & Chocolate Sponge Cake

Hi everyone! sorry for the late post another recipe. I've been on vacation with my hubby last few days >,<

Today i wanna share the special vanilla & chocolate sponge cake. i'm using a special recipe for this sponge cake. I call it special because it contain a gelatine, which hold the dry and the liquid ingredients together that make the cake so moist and delicious! :D


So, lets get started. You're going to need :

1. 100g plain all-purpose flour
2. 115g sugar (you can reduce the sugar to 100 if you want less sweet)
3. 1/2 tablespoon baking powder
4. 1/2 teaspoon salt
5. 1 teaspoon gelatin (use the powder, you can't use the gelatine leaves coz we're not gonna heat it)

6. 63ml vegetable oil (canola oil)
7. 3 egg yolks
8. 125ml cold water

9. 3 egg whites
10. 1/4 teaspoon cream of tartar


First, preheat your oven to 160 C.

Then put your egg whites and cream of tartar into a bowl, and whisk on high speed until you get soft peaks. The soft peaks means no more liquid left, so you want to whisk it until all the liquid become foamy structure.


Then put your dry ingredients (flour, sugar, baking powder, salt, and gelatine) into a bowl and using a wire whisk mix it until incorporated.
Make a well in the center of the flour mixture then pour in the oil, egg yolks, and water.

You can use the same whisk*, mix together the flour mixture for 30 seconds only until incorporated, don't over mix.


Using spatula, fold in** your egg whites in three batches to the flour and eggs mixture until they perfetcly combined. Don't over mix this, coz it will break the egg whites structure and put the air out the mixture, so the cake will be so dense, not moist.


Line the cake pans with baking paper, and divided the batter evenly. This batter will make 3 mini cake pan. so, i made 2 vanilla and 1 chocolate.

To make the chocolate sponge cake, just add 1 tablespoon cocoa powder to the remain batter, then fold it until combine.


Bake for 32-35 Minutes.


When it's done, leave in the pan and turn it upside down. We do this so the cake will stay moist (try this technique, believe me, it works! :p) and leave it to cool.


And there you have it vanilla & chocolate sponge cake. you can use this as a base for any other cake. As for my next post : Vertical Layer Rose cake :D

See inside the cake 


Enjoy! :D

*you can use the same whisk to mix the egg yolk and the egg whites. But it only applicable if you use the whisk to whisk the egg whites first, then egg yolk, not otherwise. so you can't use the whisk that you use for the egg yolks for egg whites 

**folding means using the spatula, you will fold the batter from the the bottom center of the batter, then up. Do it until incorporated. It is different from mixing. usually we use this folding method when the meringue (egg whites) was involved, because we dont want loose the air inside the batter and break the egg whites structure.